
Created by ActaLogic
www.actalogic.com
AL SOUND MANAGER
V 1.0.2 (5/2025)
MANUAL
V 1.0.0
Simplify Game Audio with
the AL Sound Manager!
5.2.2.
TransitionToPreviousSnapshot
5.2.3.
DelayedTransitionToSnapshot
5.2.5.
GetPreviousSnapshotName
5.2.6. NumberOfSnapshotPlaylists
5.3.7.4. StopAndDestroy
(This is THE IMPORTANT ONE! :)
6. Troubleshooting and
Statistics
1. Introduction
The AL Sound Manager is a powerful and versatile audio management tool designed for Unity game development. It simplifies the process of implementing game audio by providing advanced features for handling sound effects, music playback, and Audio Mixer snapshots. With intuitive controls and robust functionality, developers can control and fine-tune audio settings effortlessly, delivering a rich and immersive sound experience to players.
Key Features
§ Snapshots: Save and manage audio mixer states, including volume, effects, and routing configurations, enabling seamless transitions between diverse audio environments.
§ Sound Effects: Play and manipulate 2D, 3D (static Audio Sources), and even 4D (moving Audio Sources) sound effects with features like fading, looping, and volume overrides. The built-in pooling system ensures efficient resource management.
§ Music Player: Manage background music playback with smooth transitions, priority stacking, and support for multiple layers to create dynamic soundscapes.
§ API Integration: Offers a comprehensive set of methods for developers to programmatically control audio behavior, including transitioning snapshots, playing sound effects, and managing music playlists.
Compatible with Unity projects, the tool offers detailed documentation and best practices for seamless setup and troubleshooting. Its customizability supports a wide array of audio needs, from simple effects to complex, interactive soundscapes.
Built-in Pooling System
The sound effects pooling system
optimizes runtime performance by pre-allocating a pool of audio sources. This
approach reduces overhead from frequent object instantiation and destruction,
ensuring smooth and stable sound playback.
Key Details:
§ Initial Pool Size: Set the default pool size during initialization to meet expected audio demands.
§ Dynamic Expansion: Automatically expands the pool during runtime if the maximum limit is reached, preventing missed audio events.
§ Efficient Resource Management: Audio sources are reused after playback, minimizing memory allocations, garbage collection and CPU usage.
§ Fire-and-Forget Functionality: Many sound effects automatically return to the pool after completion, requiring little manual oversight.
§ Advanced Functionality: Wrapper methods allow for complex sound effects handling, such as volume control, pausing, resuming, stopping, looping, fading...
This system is indispensable for games or applications with frequent sound effects, ensuring consistent performance and efficient resource utilization.
Ease of Use
The AL
Sound Manager is designed to be intuitive and developer-friendly, and we will
try to keep it that way. Here's an overview of its usability:
§ Quick Setup: The tool includes a straightforward process to get started:
o Add the Sound Manager component to a GameObject.
o Create a settings file and link it to the Sound Manager.
o Configure an Audio Mixer asset and attach it to the settings scriptable object.
§ User-Friendly Interface: Easily accessible settings in the Unity editor allow intuitive configuration for snapshots, sound effects, and the music player.
§ Automated Features:
o The pooling system manages audio sources automatically for efficient playback.
o Default values and pre-configured parameters simplify the initial setup process.
§ Extensive API: Gain complete programmatic control over audio behavior, from playing sound effects to managing snapshots dynamically.
§ Detailed Documentation: Step-by-step guides, troubleshooting tips, and best practices are provided for optimizing usage.
Whether you're a novice or an expert Unity developer, the AL Sound Manager strikes a perfect balance between simplicity and functionality.
Prerequisites
To use the AL
Sound Manager effectively, ensure the following
prerequisites are met:
§ Unity Version: Use a Unity version compatible with Audio Mixer
assets (tested from Unity 2020 to Unity 6). A stable version that aligns with
your other dependencies is recommended.
§ Audio
Mixer Setup:
o
Create and
configure an Audio Mixer asset in your project.
o
Expose volume
parameters in the Audio Mixer for groups that will use snapshot PlayLists
(e.g., Menu, Game, Cutscene) and those requiring
in-game adjustments (e.g., Master,
SFX, Voice).
§ Settings
Scriptable Object:
o
Create a
settings file for the AL Sound Manager
by navigating to Assets > Create
> SoundManager > Settings.
o
Attach the settings file to the
Sound Manager component.
§ Platform Compatibility: Tested and compatible with major platforms, including Windows, Playstation 4 & 5, Xbox One & Series S|X,
Nintendo Switch, iOS and Android.
§ Audio Clips: Ensure proper preparation and import settings for
audio assets (sound effects, music tracks, custom sounds) to guarantee optimal
performance.
Simplify Game Audio with the AL Sound Manager!
Elevate your game audio with the AL Sound Manager - a cutting-edge tool designed for Unity developers. Seamlessly manage sound effects, immersive music playback, and dynamic audio snapshots to deliver exceptional soundscapes that captivate players.
With features like an optimized sound effect pooling system, user-friendly setup, and extensive API controls, the AL Sound Manager combines simplicity and powerful functionality. Tested across major platforms, it offers smooth transitions, resource-efficient audio handling, and comprehensive documentation for developers of all experience levels.
Transform your Unity project with unparalleled audio clarity and responsiveness — unlock the potential of the AL Sound Manager today!
2.  Basic Features
Snapshots
The Snapshot feature in the AL Sound Manager is a powerful tool for managing audio transitions in Unity projects.
A Snapshot represents a saved state of Unity Audio Mixer Groups, including their volume, effects, and routing configurations. By transitioning between snapshots, you can dynamically adjust the audio experience to suit different scenes or game states—such as switching from gameplay to menus or cutscenes.
With AL Sound Manager, you can create specific music playlists for designated Audio Mixer groups that automatically play music when a particular Snapshot is active, provided the group's volume is greater than 0 (-80dB). AL Sound Manager also handles the transition between Snapshots, smoothly fading music from one playlist to another.
Usage
Example
Suppose you have one main menu song that
you want to loop whenever the main menu is open and four in-game songs you want
to play sequentially on a playlist.
1. Audio
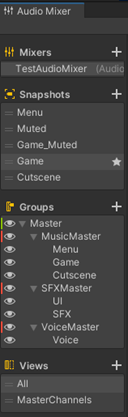
Mixer Groups Setup: Create two
dedicated groups in the Audio Mixer: »Menu«
and »Game«.
2.
Snapshots Creation:
·
Create two
Snapshots with the same names: »Menu«
and »Game«. Equal names are not
mandatory, but it will be much easier to manage by keeping consistent naming.
·
Set the »Menu« group's volume to 0dB (or your
desired volume level) in the »Menu« Snapshot,
while setting the »Game« group's
volume to -80dB (OFF).
·
For the »Game« Snapshot,
configure the volume settings in reverse.
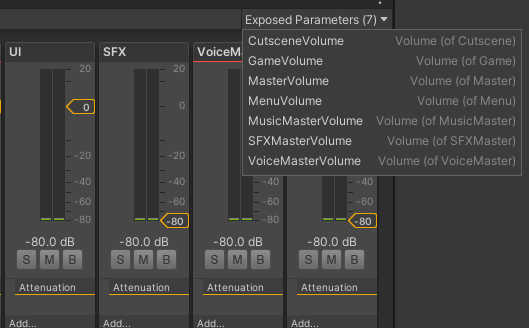
3. Exposed
Parameters: Expose the volume
parameters of the »Menu« and »Game« groups and name them accordingly
(e.g., MenuVolume and GameVolume). This naming
convention is mandatory. AL Sound Manager will automatically link
playlists with exposed parameters by their names and use them appropriately.
To use this setup you only need to call SoundMananger.TransitionToSnapshot(“Menu”) whenever the main menu is opened, and SoundMananger.TransitionToSnapshot(“Game”) when transitioning into the game.
The Sound Manager will handle Audio Source creation, playback, fading, transitioning, mixing, and stopping of audio sources as needed—all automated with just these two lines of code.
The Snapshot Player essentially acts as a music playlist player, with one playlist per assigned Audio Mixer group. It automates transitions and music selection for various game states. Even without playlists, it enables transitions between different Audio Mixer states—whether to play music, mute voices or sound effects, or set specific Audio Mixer states—all managed through one tool.
 Sound
Effects
Sound
Effects
The Sound Effects feature in the AL Sound Manager is designed to dynamically manage and play sound effects in all types of Unity projects.
Sound effects can be
played in:
·
2D: Fixed spatial blend set to 2D for non-positional
audio.
·
3D: Spatial blend set to 3D for fixed sound
positioning within a 3D space.
·
4D: Spatial blend set to 3D for moving sound
effects that dynamically follow objects in a 3D space.
This flexibility allows for precise
audio placement and interaction within the game world. Additionally, the tool
provides built-in automatic pooling, ensuring efficient resource management and
advanced control settings for individual sound effects or effect groups. These
groups enable faster setup for managing large quantities of audio effects.
·
Routing: Assign specific sound effect groups to
designated Audio Mixer channels.
·
Custom
Settings: Define fade times and
volume levels (either for entire groups or individual effects).
·
Advanced
Options:
o
Set roll-off
modes (Logarithmic, Linear, or Custom).
o
Specify
minimum and maximum sound distances for spatial attenuation.
o
Configure
pitch settings (Constant or Random).
o
Add
additional clip overrides to introduce variety in playback.
o Choose playback modes (Sequential, Random, or Random without repetition).
o While most settings are applied at the group level, they can be overridden for specific clips when needed, offering a high degree of customization.
Groups come with additional customizable parameters to fine-tune their behavior:
· Group Sound Limit: Limit the number of sounds that can play simultaneously within a group.
· Min Play Interval: Set a cooldown period (in seconds) between consecutive play calls from the same group.
·
Ignore Listener Pause: Allow sounds to
play even when AudioListener.pause is active
(useful for menus or background effects).
· Priority: Define the playback priority for sounds within the group.
Usage
examples
·
Play a 2D sound when opening a
door:
call -> SoundManager.Instance.SFX.Play2D(mySoundClip);
·
Play a 3D sound when an enemy
screams:
call -> SoundManager.Instance.SFX.Play3D(mySoundClip, enemy.position);
·
Play a 3D sound when a shot is
fired:
call -> SoundManager.Instance.SFX.Play3D(mySoundClip, gun.position);
In all these examples, when the call is made, the AL Sound Manager retrieves a free Audio Source from the pool (or creates a new one if none are available), configures all necessary audio parameters, plays the clip, and returns the Audio Source to the pool once playback stops. This process follows a fire-and-forget approach, ensuring efficient resource management.
Advanced
Usage with SoundEffectWrapper
The AL Sound Manager can also create managed SoundEffectWrapper objects, which are ideal for loopable or persistent audio effects that require on-demand destruction.
Usage
examples
· Play a rocket sound when it's fired from a plane:
call -> SoundEffectWrapper sfx = SoundManager.Instance.SFX.Play4DWrapperLoop(myRocketLoopableSound, rocket.transform);
This plays a looping rocket sound with a spatial blend set to 3D, dynamically moving with the rocket.
· Stop the sound after the rocket explodes:
call -> sfx.StopAndDestroy();
This stops
the sound and returns the Audio Source to the pool for reuse.
With SoundEffectWrapper you can: play, pause, stop, replay, delay playback, apply fades, access the underlying Audio Source, reuse and finally destroy (return to pool). This advanced system ensures flexibility while maintaining efficient resource handling.
 MusicPlayer
The Music Player feature in the AL Sound Manager is designed to seamlessly manage background audio in Unity projects, often without requiring any coding.
In addition to playing music, it can also be used for environmental effects—whether global or location-based—such as wind, birds, flowing rivers, rain, or road traffic, etc… This flexibility makes it an excellent choice for creating dynamic, immersive soundscapes.
The Music Player enables developers to:
·
Play music
and environmental effects.
·
Handle
transitions smoothly.
·
Dynamically
adjust playback settings at runtime based on player location or triggered
events.
It utilizes MusicPlayerTrigger scripts attached to scene GameObjects, which define play areas using volume zones. These zones can be set as global or localized to specific areas. With advanced features like fade controls and prioritization, the Music Player creates tailored audio experiences for a wide variety of gameplay scenarios.
·
Enable/Disable Music: Toggle the music on or off, with options for
smooth fades or immediate cuts.
·
Volume Transitions: Dynamically adjust the music volume based on
player position.
·
Ignore Listener Pause: Allow music playback even when AudioListener.pause is set to
true—ideal for maintaining background music during pause menus or similar
scenarios.
·
Transitions Between Songs: Ensure smooth transitions between tracks,
adjusting seamlessly with volume settings.
·
Multiple Music Layers: Play multiple tracks simultaneously, such as main
background music combined with ambient sounds like wind or birds.
·
Priority Queue: When multiple MusicPlayerTriggers overlap, priority settings determine which clip
will play.
·
OnTriggerEnter/Exit or Custom Volume Checks: Use PhysX trigger events or custom built-in volume
checks to precisely define play areas and transitions between music states.
·
Different Volume Triggers supported: Box and Sphere colliders with custom rotations
and scales allowed.
Usage
example
1.
Global Music:
Create a MusicPlayerTrigger in the scene to start a main background song. Mark the trigger as GLOBAL, so the music starts automatically when the scene is loaded and becomes active.
2. Local Music for Specific Areas:
Add a second MusicPlayerTrigger in room 2 of your level. Use a box collider (set as a trigger) to define the room's bounds. The collider defines a local volume.
Set the fade time to 4 seconds and assign a scary music clip with a volume 20% higher than the main music.
Behavior:
· When the player enters room 2, the global music fades out, and the scary music fades in over 4 seconds.
· While the player remains in room 2, the scary music plays continuously.
· Upon leaving room 2, the scary music fades out, and the global track smoothly fades back in.
3. Quick Start Guide
1. Add the
SoundManager Component:
Attach
the SoundManager component to a
GameObject. Since SoundManager is a
singleton and accessible from anywhere in your project, ensure it’s not
destroyed during runtime. Ideally, place the SoundManager object in a
persistent scene to keep it active throughout the project lifecycle. Although it is not recommended,
you can have multiple SoundManagers
or Settings files in the project.
However, you must take into account that SoundManager is a singleton
and should be handled accordingly.
To
create a GameObject with the SoundManager script on it you can
navigate to:
GameObject > Audio > AL SoundManager
2. Create a Settings File:
·
Navigate to Assets > Create > AL SoundManager > Settings to create a “Sound Manager Settings” file (Scriptable object).
·
Link the settings file to the SoundManager component.
3. Create
an Audio Mixer Asset:
Go to Assets > Create > Audio Mixer to create an Audio
Mixer asset.
Link the
Audio Mixer in your settings
scriptable object. You can access the settings via the [Settings] button on the SoundManager component or directly within
your Unity project.

4.
 Set Up the Audio Mixer:
Configure the number of snapshots and groups based on your project requirements. An example can be seen on the screenshots.
Important Note
Using Snapshots to play music is not mandatory by default, but it is highly useful for implementing transitions between MENU and GAME states for example. If Snapshots playlists are not used, the Snapshot setup is not required.
5.
Expose Volume Parameters:
To Adjust Volume via Code or UI (for example from the Menu): Expose the volume parameter for the groups you wish to
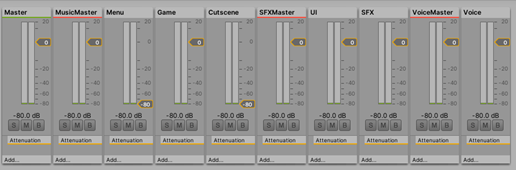
control, such as Master, MusicMaster, SFXMaster, and VoiceMaster. Choose intuitive names for ease of coding. A call from
code will override Snapshot settings for this Group. This is the way to let the player control different
volume levels across the game. In the example above, this Groups are called
»Master« groups, and all Snapshots have an unchanged value for them.
IMPORTANT NOTE: Never set the volume from code to groups that are associated with Shapshot
playlists.
For Snaphot Playlist-Specific
groups: Expose volume
parameters for specific groups designed for playlists, such as Menu, Game, and Cutscene. These exposed parameters should not be called directly from
the code. Instead, the naming
convention should follow the format: Group Name + Volume (e.g., for the
group Cutscene, the exposed parameter name should be CutsceneVolume). Snapshot playlists will automatically stop/pause the
underlaying Audio Source if the volume is to low, to preserve resources.
6. Set Up Sound Effects: Define and configure sound effects in the SoundManager Settings.
7. Set Up Snapshots (if applicable): Configure Snapshot playlists for specific audio
transitions.
8. Configure the Music Player: Minimal setup is required within the SoundManager for
the in-game Music Player. Most of the configuration is done using MusicPlayerTrigger
GameObjects in the scene.
This quick setup covers everything needed to
begin a new Unity project. Once completed, the AL Sound Manager will be
fully operational and ready for use.
For more detailed instructions on configuring
SoundManager settings, refer to the following sections in the manual.
4. Feature Settings
4.1. 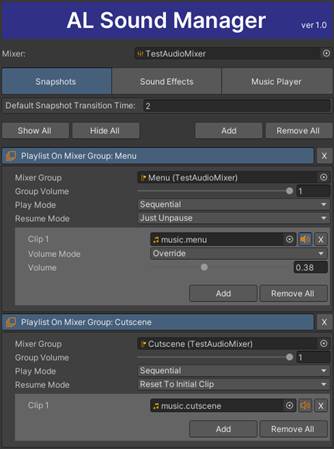 Snapshots
A Snapshot is a saved state of the Audio Mixer Group, including their volume, effects, and routing configurations. Snapshot playlists are used to automatically play audio clips when a specific snapshot is active. To use Snapshot Playlists in the AL Sound Manager, ensure the Audio Mixer is set up first!
Global Parameters:
o Default Snapshot Transition Time: The default time (in seconds) required to transition between audio mixer snapshots.
Playlist on
Mixer Group Parameters:
o Mixer Group: The output mixer group associated with this playlist.
o Group Volume: The Audio Source volume applied to this playlist.
o Play Mode: The order in which playlist clips are played:
§ Sequential: Clips are played in the order they appear on the list continuously.
§ Shuffle on init: The playlist is shuffled once during initialization and then played in the shuffled order continuously.
§ Random: A random clip is selected at the start; when it finishes, another random clip from the list is selected, and so on.
§ Random but no repeat: A random clip is selected at the start. After finishing, the next random clip is chosen, ensuring it’s not the same as the last played clip.
§ PlayFrst + RepeatTheRestSequentially – The first clip in the list always plays at the start. Subsequent clips are played in sequential order, skipping the first clip during repeats. The first clip will replay only if there’s a transition out and back to the assigned Snapshot with the correct Resume Mode.
o Resume Mode:
§ Just unpause: Resumes the playlist from the point where it was paused.
§ Reset to initial clip: Starts playback from the beginning of the first clip in the list, as defined by the Play Mode.
§ Replay current clip: Repeats the paused clip and then continues playback based on the Play Mode.
o Clip(s): Audio clips included in the playlist for the selected Mixer Group.
§ ![]() Show/Hide
Volume Override: Displays
override options for clip volume. When the icon is filled
Show/Hide
Volume Override: Displays
override options for clip volume. When the icon is filled ![]() , the clip has a volume override (Volume Mode is different from Inherit).
, the clip has a volume override (Volume Mode is different from Inherit).
§ Volume Mode:
§ Inherit: The clip inherits the volume
from the group (default).
§ Multiply: The clip volume is multiplied
by the group volume (Final Volume = Group Volume ×
Clip Volume).
§ Override: The clip overrides the group
volume; the final volume is set to the clip volume value.
§ Volume:
Defines the Audio
Source volume if the Volume Mode
is set to Multiply (group volume × clip
volume) or Override (direct clip volume).
4.2. Sound Effects
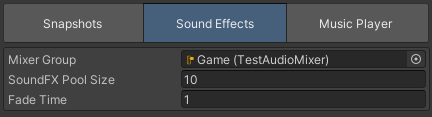
Global Parameters
· Mixer Group: Specifies the Audio Mixer group on which all sound effects will play. This setting can be overridden for individual sound effect groups as needed.
· SoundFx Pool Size: Defines the initial pool size for all sound effects. The Sound Manager preloads this number of audio sources during initialization and automatically expands the pool at runtime if required.
· Fade Time: Sets the default fade in/out duration used when playing a sound effect clip, unless a custom value is provided via a script.

Group Parameters
· Override Mixer Group: Allows overriding the global mixer group. This is useful when certain sound effects, such as UI sounds, need to be played on a different mixer group.
· Group Volume: Defines the volume level for all clips within the group.
· Rollof Mode: Specifies how the sound fades based on distance from the listener.
o Logarithmic: It mimics how sound naturally attenuates in real-world environments, resulting in a more realistic audio experience. In nature, sound intensity decreases rapidly as distance from the source increases, and logarithmic attenuation closely replicates this behavior.
o Linear: The sound fades gradually as the listener moves away from the audio source.
o Custom: The sound's behavior is determined by a default custom rolloff graph as defined by the Audio Source
· Min Sound Distance: The distance within which the sound remains at its maximum volume. Beyond this range, attenuation begins. Increase Min Sound Distance to make a sound "louder" in the 3D environment, or decrease it for "quieter" sound placement.
· Max Sound Distance: The distance at which sound attenuation stops. Beyond this point, the sound maintains a fixed volume equivalent to its level at Max Sound Distance units from the listener.
· Group Sound Limit: Sets the maximum number of sounds from this group that can play simultaneously. Set to 0 or less if no limit is required.
· Min Play Interval: Defines the minimum time (in seconds) that must elapse between consecutive play calls for sounds in the group.
Advanced Group
Parameters
·
Ignore Listener Pause: Allows the AudioSource to play even when AudioListener.pause is set to true. This is particularly useful
for menu element sounds or background music in pause menus.
· Bypass Effects/Listener Effects/Reverb Zones: Sets the bypass values of the Audio Source.
· Priority: Sets the playback priority of the Audio Source. Higher priority ensures the sound is played when there are system limitations on simultaneous audio sources.
· Doppler Level: Adjusts the Doppler effect scale for the Audio Source, simulating audio pitch changes based on relative movement. Default == 0 (OFF)
·
Pitch Mode:
o Constant: Applies the same pitch to all clips played by the AudioSource.
o Random: Sets a random pitch within a defined min/max range each time the AudioSource plays a clip. This is especially useful for adding variety to repetitive sounds, like footsteps, ensuring they sound slightly different every time.
· Pitch: Defines the pitch value for the AudioSource. Can be adjusted to speed up or slow down the playback, affecting the perceived tone of the sound.
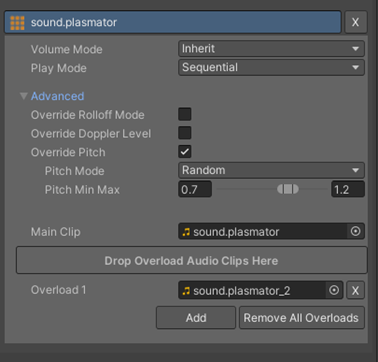 Sound Effect Parameters
·
Volume Mode:
o Inherit: The sound effect inherits the volume from the group setting. (Default)
o Multiply: The sound effect's volume is calculated by multiplying the group volume and the sound effect's individual volume.
o Override: The sound effect overrides the group volume and plays at its own defined volume.
·
Play Mode:
o Sequential: Each playback of the sound effect plays a different clip from the list in sequential order. Has no effect if only the main clip is linked.
o Random: Each playback of the sound effect plays a random clip from the list. Has no effect if only the main clip is linked.
o Random No Repeat: Each playback of the sound effect plays a random clip from the list, ensuring it does not repeat the same clip as the last playback. Has no effect if only the main clip is linked.
· Main Clip: The primary clip assigned to the sound effect. NOTE: The AL Sound Manager will always play clips based on the Main Clip reference!
· Overloads: Optional additional clips for introducing more variety to the sound effect.
Advanced Sound Effect Parameters
· Override Rolloff Mode: Enables custom rolloff behavior for the sound effect, overriding the group settings.
· Override Doppler Level: Allows customization of the Doppler effect for the sound effect, overriding the group level.
· Override Pitch: Permits custom pitch settings for the sound effect, overriding the group pitch configuration.
4.3. Music Player
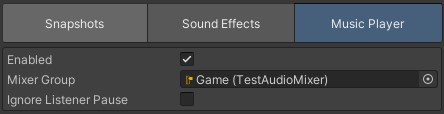
· Enabled: Activates the Music Player. If disabled, no Music Player Triggers in the scene will function.
· Mixer Group: Specifies the Audio Mixer group where the Music Player clips will be played.
·
Ignore
Listener Pause: Allows the AudioSource to
continue playing even when AudioListener.pause is set to true. This is
particularly useful for maintaining background music during pause menus or
similar scenarios.
4.4. Music Player Trigger
Create Music Player Trigger from the menu:
GameObject > Audio >
MusicPlayerTrigger
 Audio properties:
·
Music Layer: Specifies
the MusicPlayer layer on which the MusicClip will play. Only one
Music Player Trigger can play a clip on a given layer, determined by the Priority setting. If multiple triggers
share the same priority, the first clip with this priority from the internal
list will be played (the order is unpredictable).
·
Music Clip: The audio
file to be played.
·
Priority: A higher
value indicates a higher playback priority.
·
Volume: Defines the
value to be applied to the AudioSource component.
· Fade Time: Controls the fade duration from silent to active or back to silent. When priorities change, the currently playing audio fades out based on its fade time, and the new audio fades in using the fade time defined for its respective trigger.
Volume Settings:
·
IsGlobal = TRUE: When set to TRUE, the
Audio is always added to the MusicPlayer stack when the Music
Player Trigger is enabled and removed from the stack when the Trigger is
disabled. A collider on this Music Player Trigger is not needed!
·
IsGlobal
= FALSE: If IsGlobal
is set to FALSE, the trigger volume must be configured:
·
Triggers:
o
OnTriggerEnter
| Exit (using PhysX)
o
Inside | Outside
Volume
IMPORTANT NOTE:
OnTriggerEnter | Exit: When OnTrigger events are selected, the Music Player Trigger will add the Audio to the Music Player stack
upon OnTriggerEnter and
remove it upon OnTriggerExit. However, teleporting colliding objects into or out of the
Trigger may not trigger the Enter/Exit
events as expected.
Inside | Outside Volume: This option periodically checks whether the
Reference object's transform.position is inside or outside the trigger volume defined by the Music
Player Trigger, based on the Check Interval
setting. This method is simpler and more reliable, as it ensures the correct
state (inside/outside) is returned during each check.
·
IF OnTriggerEnter|Exit option is
selected:
o
Trigger Layer Mask: Define
the layers that can collide with the Music Player Trigger.
·
IF Inside|Outside
Volume option is selected:
o
Find Reference By Tag:
§ If TRUE: The AL Sound
Manager automatically locates the GameObject with the specified Reference Tag and performs volume checks using its transform.position.
§ If FALSE: The reference
object must be manually assigned via the Inspector or in code using MusicPlayerTrigger.SetCustomTriggerReference.
o
Reference Tag: The tag
used to find the reference GameObject in the scene.
o
Reference: A linked
reference object whose transform.position is used to
determine whether the Music Player Trigger should be enabled or disabled.
o
Check Interval: Specifies how frequently (in seconds) the volume
influence checks are performed. Typical values range between 0.5s and 1.0s, but
adjust based on your needs and consider the average fade times of all Music
Player Triggers.
Only BOX and SPHERE colliders are supported as triggers. You can utilize transform Scale and Rotation along with Center and Size parameter for Box or Center and Radius for Sphere. It is not recommended to adjust the transform scale—keep it set to (1, 1, 1).
If the Inside|Outside
option is enabled, the Collider will automatically be disabled during gameplay.
The bounds will be cached.
5. API
5.1. General methods
5.1.1. MuteMixerGroup
public void MuteMixerGroup( string exposedParameterName, bool muted )
Parameters:
|
exposedParameterName |
Name of the exposed volume parameter. |
|
muted |
muted |
Description:
Sets the Audio
Mixer Group to muted or unmuted. Do not use this method
on groups that are connected with Snapshot playlists.
Usage:
|
// Mute a group SoundManager.Instance.MuteMixerGroup( "VoiceVolume" , true ); |
5.1.2. SetMixerGroupVolume
public void SetMixerGroupVolume( string exposedParameterName, float volume )
Parameters:
|
exposedParameterName |
Name of the exposed volume parameter. |
|
volume |
0 – 100 (automatic Linear To Decibel conversion) |
Description:
Sets
the volume of an Audio Mixer Group to a specific value. Avoid using this method on groups linked to
Snapshot playlists, as it may interfere with their functionality. This
method is designed to allow players to adjust volume levels and fine-tune their
audio experience.
Usage:
|
// Drop the volume of sounf effects by 50% SoundManager.Instance.SetMixerGroupVolume( "SFX" , 50.0f ); |
5.1.3. PauseAudioListener
public void PauseAudioListener( bool pause )
Parameters:
|
pause |
bool |
Description:
A
helper method that allows to change the listener pause/unpause state from Sound
Manager.
Usage:
|
// Pause Audio Listener: all clips stops playing except those that ignore the pause state. SoundManager.Instance.PauseAudioListener( true ); |
5.2. Snapshots
5.2.1. TransitionToSnapshot
public void TransitionToSnapshot( string snapshotName )
public void TransitionToSnapshot( string snapshotName, float transitionTime )
Parameters:
|
snapshotName |
Target snapshot name set in audioMixer. |
|
transitionTime |
Transition duration in seconds. |
Description:
Initiates a transition to the specified snapshot using either the default transition time or a custom duration. If snapshot playlists are linked, they will also transition automatically as part of the snapshot change. This ensures smooth audio transitions tailored to the active scene or game state.
Usage:
|
// Transition to snapshot with default time SoundManager.Instance.Snapshots.TransitionToSnapshot( " Game " ); // Transition to snapshot with custom transition time SoundManager.Instance.Snapshots.TransitionToSnapshot( " Menu ", 1.0f ); |
5.2.2. TransitionToPreviousSnapshot
Declaration:
public void TransitionToPreviousSnapshot()
public void TransitionToPreviousSnapshot( float transitionTime )
Parameters:
|
transitionTime |
Transition duration in seconds. |
Description:
Initiates
a transition to the previous snapshot, using
either the default transition time or a custom duration. If snapshot playlists
are linked, they will also transition automatically as part of the snapshot
change. This ensures smooth audio transitions tailored to the active scene or
game state.
Usage:
|
// Transition to previous
snapshot with default transition time SoundManager.Instance.Snapshots.TransitionToPreviousSnapshot();
// Transition to previous snapshot with custom transition time SoundManager.Instance.Snapshots.TransitionToPreviousSnapshot( 1.0f ); |
5.2.3. DelayedTransitionToSnapshot
Declaration:
public void DelayedTransitionToSnapshot( string snapshotName, int delayFrames = 2 )
public void DelayedTransitionToSnapshot( string snapshotName, float transitionTime, int delayFrames = 2 )
public void DelayedTransitionToSnapshot( string snapshotName, float delayTime )
public void DelayedTransitionToSnapshot( string snapshotName, float transitionTime, float delayTime )
Parameters:
|
snapshotName |
Target snapshot name set in audioMixer. |
|
transitionTime |
Transition duration in seconds. |
|
delayFrames |
Number of frames delayed before starting the transition. |
|
delayTime |
A delay in seconds before starting the transition. |
Description:
Initiates
a transition to the specified snapshot with a delay
in frames or seconds and the default transition time or a custom duration. If
snapshot playlists are linked, they will also transition automatically as part
of the snapshot change. This ensures smooth audio transitions tailored to the
active scene or game state.
Usage:
|
// Delayed transition to
snapshot with default 2 frames delay SoundManager.Instance.Snapshots.DelayedTransitionToSnapshot( "Menu" );
// Delayed transition to snapshot with custom delay time seconds SoundManager.Instance.Snapshots.DelayedTransitionToSnapshot( "Menu", 1.0f );
// Delayed transition to snapshot with custom delay time in frames SoundManager.Instance.Snapshots.DelayedTransitionToSnapshot( "Menu", 10 );
// Delayed transition to
snapshot with custom transition time and custom delay time SoundManager.Instance.Snapshots.DelayedTransitionToSnapshot( "Menu", 1.0f, 0.5f ); |
5.2.4. GetActiveSnapshotName
Declaration:
public string GetActiveSnapshotName()
Description:
Returns the name
of the currently active snapshot. After initialization, this method will return
the default snapshot name, which is "Audio Mixer Default".
5.2.5. GetPreviousSnapshotName
Declaration:
public string GetPreviousSnapshotName()
Description:
Returns the name of the previously active snapshot. If no previous snapshot exists, this method will return an empty string.
5.2.6. NumberOfSnapshotPlaylists
Declaration:
public int NumberOfSnapshotPlaylists {get;}
Description:
This property retrieves the total count of Snapshot playlists defined within the Sound Manager Settings.
5.3. Sound Effects
5.3.1. Play2D
Declaration:
public void Play2D( AudioClip soundEffectRef )
public void Play2D( AudioClip
soundEffectRef, float delay, float volume = -1.0f )
Parameters:
|
soundEffectRef |
Sound effect clip. |
|
delay |
Start delay in seconds. |
|
volume |
Optional override for volume. Default -1.0f (<0.0f) means that the volume from settings will be used. A volume >= 0.0f will override the default settings volume: finalVolume = clamp01(volume) |
Description:
Plays a sound effect in a 2D audio environment, with optional delay. This is a 'fire-and-forget' method, meaning that the audio source is automatically pooled and released once the sound effect finishes.
Usage:
|
// Play 2D sound effect SoundManager.Instance.SFX.Play2D( soundEffectClip );
// Play a delayed 2D sound
effect SoundManager.Instance.SFX.Play2D( soundEffectClip , 0.5f ); // Play a delayed 2D sound effect with volume override SoundManager.Instance.SFX.Play2D( soundEffectClip , 0.5f , 0.75f ); |
5.3.2. Play3D
Declaration:
public void Play3D( AudioClip
soundEffectRef, Vector3 position )
public void Play3D( AudioClip soundEffectRef, Vector3 position, float delay, float volume = -1.0f )
Parameters:
|
soundEffectRef |
Sound effect clip. |
|
position |
World space position where the sound will be played. |
|
delay |
Start delay in seconds. |
|
volume |
Optional override for volume. Default -1.0f (<0.0f) means that the volume from settings will be used. A volume >= 0.0f will override the default settings volume: finalVolume = clamp01(volume) |
Description:
Plays a sound effect as 3D audio at a specified world space position, with an optional delay. This is a 'fire-and-forget' method, meaning the audio source is automatically pooled and released once the sound effect finishes.
Usage:
|
Tranform target = gameObject.tranform; // Play sound effect in 3D space
on fixed position SoundManager.Instance.SFX.Play3D( soundEffectClip, target.position );
// Play delayed sound effect in
3D space on fixed position SoundManager.Instance.SFX.Play3D( soundEffectClip, target.position, 1.0f); // Play delayed sound effect in 3D space on fixed
position with volume override SoundManager.Instance.SFX.Play3D( soundEffectClip, target.position, 1.0f, 0.5f); |
5.3.3. Play4D
Declaration:
public void Play4D( AudioClip soundEffectRef, Transform transform )
public void Play4D( AudioClip
soundEffectRef, Transform transform, float delay, float volume = -1.0f )
Parameters:
|
soundEffectRef |
Sound effect clip. |
|
transform |
Parent target transform under which the sound effect will play. |
|
delay |
Start delay in seconds. |
|
volume |
Optional override for volume. Default -1.0f (<0.0f) means that the volume from settings will be used. A volume >= 0.0f will override the default settings volume: finalVolume = clamp01(volume) |
Description:
Plays a sound effect as 3D audio, with an optional delay, while reparenting it under the specified target transform. Tha Audio Source will move with the parent transform. This is a 'fire-and-forget' method, meaning the audio source is automatically pooled and released once the sound effect concludes.
Usage:
|
// Play sound effect in 3D space under transform SoundManager.Instance.SFX.Play4D( soundEffectClip , player.transform );
// Play delayed sound effect in
3D space under transform SoundManager.Instance.SFX.Play4D( soundEffectClip , player.transform, 1.0f );
// Play delayed sound effect in
3D space under transform with volume override SoundManager.Instance.SFX.Play4D( soundEffectClip , player.transform, 0.5f, 1.0f ); |
5.3.4. Play2DWrapper
Declaration:
public SoundEffectWrapper Play2DWrapper ( AudioClip soundEffectRef, bool loopable = false )
public SoundEffectWrapper Play2DWrapper ( AudioClip soundEffectRef, float delay, bool loopable = false )
public SoundEffectWrapper Play2DWrapperLoop( AudioClip soundEffectRef, float delay, float fadeInTime )
Parameters:
|
soundEffectRef |
The audio clip for the sound effect. |
|
delay |
Start delay in seconds. |
|
fadeInTime |
Fade in/out time in seconds. |
|
loopable (optional) |
Creates a loopable sound effect if set to true. |
Description:
Plays a sound
effect as 2D audio (optional: loopable) and returns a SoundEffectWrapper as a reference to control the sound effect during runtime.
|
! |
This sound effect is not automatically pooled. To prevent memory
leaks, you must call either |
Usage:
|
// Play sound effect in 2D space
returning a reference SoundEffectWrapper sfx = SoundManager.Instance.SFX.Play2DWrapper( sfxClip);
// Play delayed sound effect in
2D space returning a reference SoundEffectWrapper sfx =
SoundManager.Instance.SFX.Play2DWrapper( sfxClip, 1.0f ); // Play delayed loopable sound
effect in 2D space with fade in and returning a reference SoundEffectWrapper sfx = SoundManager.Instance.SFX.
Play2DWrapperLoop( sfxClip, 1f, 0.5f ); // when the SFX is not needed
anymore sfx.StopAndDestroyWithFade( sfx ); |
5.3.5. Play3DWrapper
Declaration:
public SoundEffectWrapper Play3DWrapper( AudioClip
soundEffectRef, Vector3 position, bool loopable = false )
public SoundEffectWrapper Play3DWrapper( AudioClip
soundEffectRef, Vector3 position, float delay, bool loopable = false )
public SoundEffectWrapper Play3DWrapperLoop( AudioClip soundEffectRef, Vector3 position, float delay, float fadeInTime )
Parameters:
|
soundEffectRef |
Sound effect clip. |
|
position |
World space position where the sound will be played. |
|
delay |
Start delay in seconds. |
|
fadeInTime |
Fade in/out time in seconds. |
|
loopable (optional) |
Creates a loopable sound effect if set to true. |
Description:
Plays a sound
effect as 3D audio at a specified world space position, with an optional delay,
fade time or loopable mode, and returns a SoundEffectWrapper as a reference to control the sound effect during runtime.
|
! |
This sound effect is not automatically pooled. To prevent memory
leaks, you must call either |
Usage:
|
Vector3 pos = gameObject.transform.position; // Play sound effect in 3D space
at the target position returning a reference SoundEffectWrapper sfx = SoundManager.Instance.SFX. Play3DWrapper( sfxClip , pos ); // Play delayed sound effect in
3D space at the target position returning reference for later use SoundEffectWrapper sfx = SoundManager.Instance.SFX. Play3DWrapper( sfxClip , pos , 1f ); // Play delayed loopable sound
effect in 3D space at the target position returning a reference SoundEffectWrapper sfx = SoundManager.Instance.SFX.
Play3DWrapperLoop( sfxClip, pos, 1f, 1f ); // when the SFX is not needed
anymore sfx.StopAndDestroyWithFade( sfx ); |
5.3.6. Play4DWrapper
Declaration:
public SoundEffectWrapper Play4DWrapper( AudioClip
soundEffectRef, Transform transform, bool loopable = false )
public SoundEffectWrapper Play4DWrapper( AudioClip
soundEffectRef Transform transform, float delay, bool loopable = false )
public SoundEffectWrapper Play4DWrapperLoop( string soundEffectName, Transform transform, float delay, float fadeInTime )
Parameters:
|
soundEffectRef |
Sound effect clip. |
|
transform |
Parent transform under which the sound effect will play. |
|
delay |
Start delay in seconds. |
|
fadeInTime |
Fade in/out time in seconds. |
|
loopable (optional) |
Creates a loopable sound effect if set to true. |
Description:
Plays a sound effect as 3D audio, with an optional delay, fade or loopable state, while reparenting it under the specified target transform. Tha Audio Source will move with the parent transform. A SoundEffectWrapper as reference is returned to control the sound effect during runtime
|
! |
This sound effect is not automatically pooled. To prevent memory
leaks, you must call either |
Usage:
|
// Play sound effect in 3D space
under tranfrom returning reference SoundEffectWrapper sfx = SoundManager.Instance.SFX.Play4DWrapper(
sfxClip, transform ); // Play delayed sound effect in
3D space under tranfrom returning reference SoundEffectWrapper sfx = SoundManager.Instance.SFX.Play4DWrapper(
sfxClip, transform, 1f ); // Play delayed sound effect in
3D space under tranform with fade in returning reference SoundEffectWrapper sfx = SoundManager.Instance.SFX.
Play4DWrapperLoop( sfxClip,
transform, 1f, 0.5f ); // when the SFX is not needed
anymore sfx.StopAndDestroyWithFade( sfx ); |
5.3.7. SoundEffectWrapper
Description:
The SoundEffectWrapper class is a utility designed to facilitate the management and control of sound effect playback. Acting as a wrapper around the AudioSource component, it extends functionality by providing advanced options for playing, fading, pausing, and stopping audio. Additionally, it integrates seamlessly with the SoundEffectPlayer to efficiently manage pooled sound effects and optimize audio resource usage.
Properties:
|
AudioSource |
Returns the associated AudioSource object. |
|
SoundFx |
Provides the settings for the sound effect. |
|
FadeDirection |
Indicates the fade direction (None, FadeIn, FadeOut). |
|
FadeTime |
Returns the duration of the fade effect. |
|
DefaultFadeTime |
Provides the default fade duration. |
|
TargetVolume |
Specifies the target AudioSource volume after fading. |
|
DelayTime |
Sets the delay before the sound effect starts playing. |
|
ReturnToPool |
Indicates whether the sound effect will be returned to the pool (true or false) |
|
IsPaused |
Returns true if the AudioSource is currently paused. |
|
IsStopped |
Returns true if the AudioSource is currently stopped. |
5.3.7.1. Play
Declaration:
public void Play()
public void PlayWithDelay()
public void PlayWithDelay( float
param_delayTime )
public void PlayWithFade()
public void PlayWithFade( float
param_fadeInTime )
public void PlayWithFadeAndDelay()
public void PlayWithFadeAndDelay( float param_fadeTime, float param_delayTime )
Parameters:
|
param_delayTime |
Start delay in seconds. |
|
param_fadeInTime |
Fade in time in seconds. |
Description:
Plays the sound effect with the optional delay or fade.
5.3.7.2. Pause
Declaration:
public void Pause()
public void UnPause()
public void TogglePause()
public void Pause( bool paused )
Parameters:
|
paused |
When
set to |
Description:
Allows you to pause or resume the playback of a sound effect.
5.3.7.3. Stop
Declaration:
public void Stop()
public void StopWithFade()
public void StopWithFade( float fadeOutTime )
Parameters:
|
fadeOutTime |
Fade out time in seconds. |
Description:
Stops the playback of the sound effect, with an optional fade-out effect. This action will not initiate pooling. StopWithFade() uses the default fade time.
5.3.7.4. StopAndDestroy (This is THE IMPORTANT ONE! :)
Declaration:
public void StopAndDestroy( out
SoundEffectWrapper wrapper )
public void StopAndDestroyWithFade( out SoundEffectWrapper wrapper )
public void StopAndDestroyWithFade( float fadeOutTime, out SoundEffectWrapper wrapper )
Parameters:
|
wrapper |
Represents
the reference on which |
|
fadeOutTime (optional) |
Specifies the fade-out duration (in seconds). |
Description:
Stops the sound
effect and returns it to the pool for efficient resource management. The
methods provide flexibility by supporting immediate stops, stops with a default
fade time, or stops with a custom fade duration.
Usage:
|
// Stops
the effect, returns it to the pool, and sets the (out) wrapper to null wrapper.StopAndDestroy(out wrapper ); |
5.4. Music Player
Description:
The MusicPlayer class is a system designed for managing background music playback
in games. It supports advanced functionality, such as handling a prioritized
stack of music tracks, smooth transitions, and precise volume control. While
the MusicPlayer is typically controlled by MusicPlayerTriggers directly within the scene, it also allows for dynamic audio layer
manipulation during gameplay via code.
The MusicContainer structure contains detailed information about the playing track.
Using the Play and Stop methods, you can add or
remove items from the MusicPlayer's internal system.
Example:
Imagine a MusicContainer that holds a special song with the highest priority, intended for
the puzzle section of your game. When the puzzle begins, you can add this
container to the MusicPlayer's stack, causing the music to start playing at
that moment. Once the puzzle ends, you can remove the container from the stack,
reverting the MusicPlayer back to the previous state seamlessly.
5.4.1. Play and Stop
Declaration:
public void Play( MusicContainer container )
public void Stop( MusicContainer container )
Parameters:
|
container |
A structure that contains all the necessary information about the music. |
Description:
Manages the
playback of the specified music by adding or removing the MusicContainer to or from the MusicPlayer stack. This does not
directly play or stop the music; instead, the MusicPlayer dynamically decides which tracks to play based on the configuration
(priority) within the MusicContainer.
6. Troubleshooting and Statistics
The AL Sound Manager includes a user-friendly debugging utility that provides statistical data about the system's runtime activity. To enable data collection and see the statistics, select the GameObject containing the AL Sound Manager component and activate the “Statistical Data” toggle button. This will open a panel displaying essential information and insights into the internal processes of the Sound Manager.
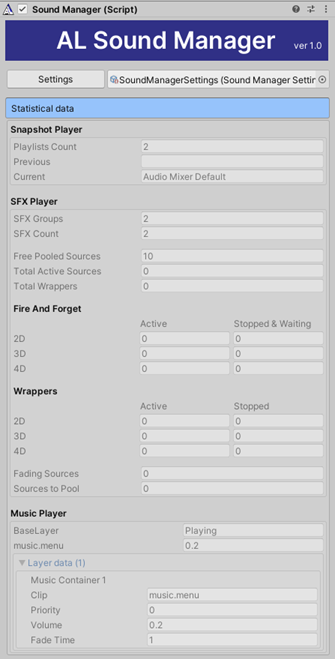
Snapshot Player
· Playlists Count: Number of snapshot playlists in settings.
· Previous: The previously active Audio Mixer snapshot.
· Current: The currently active Audio Mixer snapshot.
SFX Player
· SFX Groups: Number of Sound Effect groups in Settings.
· SFX Count: Total number of Sound Effects across all groups.
·
Free Pooled Sources: Number of free
Audio Sources in the pool, ready for use.
· Total Active Sources: Audio Sources currently taken from the pool.
· Total Wrappers: AudioSourceWrappers created and active during runtime.
Fire and Forget
· Active: Number of Audio Sources currently playing.
· Stopped&Waiting: Number of Audio Sources waiting to return to the pool (the Manager delays collection for performance optimization).
· 2D: Effects played using Play2D methods.
· 3D: Effects played using Play3D methods.
· 4D: Effects played using Play4D methods.
Wrappers
· Active: Number of Audio Sources (Wrappers) currently playing.
· Stopped: Number of idle (stopped) Audio Sources (Wrappers).
· 2D: Effects played using Play2DWrapper or Play2DWrapperLoop methods.
· 3D: Effects played using Play3DWrapper or Play3DWrapperLoop methods.
· 4D: Effects played using Play4DWrapper or Play4DwrapperLoop methods.
· Fading Sources: All Audio Sources currently fading in or out.
· Sources to Pool: Number of "fire-and-forget" 4D SFX and destroyed Wrappers waiting to be pooled.
![]() Music Player
Music Player
Displays a list of all active Music Player layers, each showing:
· Layer name and status
· Current active clip/audio
· Main MusicContainer Settings: clip name, priority, volume and fade time
7. Best Practices
Recommendations
for optimal usage:
Snapshots:
·
Utilize snapshot playlists for
Main Menu or In-game Menu music to ensure a seamless and organized audio
experience. For game music or ambient audio, leverage the MusicPlayer feature for enhanced control and transitions.
· Keep in mind that the Audio Mixer is a powerful tool that, when properly configured, can save you significant coding effort and prevent potential issues. If your game has multiple states with different audio settings, create Audio Mixer snapshots that are correctly configured (groups, group hierarchy volume levels, and effects) to support those setups.
Sound Effects:
·
The AL Sound Manager relies on audio clip references for methods like Play2D and Play3D. This eliminates the need
for string-based lookups, reducing typing errors, minimizing garbage
collection, and allowing faster access to sound effects data within the Sound
Manager. When calling sound effects from the script, use Audio Clip properties to assign
the clips. This approach avoids manual typing of names and makes the code more
robust and less error-prone.
· Set the initial pool size to a minimal but sufficient value. The Sound Manager is designed to dynamically increase the pool size as needed, ensuring efficient resource management.
· Group sound effects logically based on the common settings they share. While the number of groups doesn't create significant overhead, it is still wise to organize them thoughtfully.
· Use clip overloads to introduce variety. Additionally, consider leveraging pitch randomization to achieve a similar effect where applicable.
· Group Sound Limits: For an improved audio experience, always set the correct Group Sound limit to prevent too many sounds from being played simultaneously.
· Cooldown Intervals: Set a minimum cooldown interval between playing two consecutive effects from the same group. This helps avoid stacking too many sounds at once and ensures audio clarity.
· Utilize Fire-and-Forget sound effects whenever possible. This approach simplifies sound effect usage, reduces confusion, and enhances safety by streamlining audio management.
MusicPlayer:
· Combine GLOBAL and LOCAL MusicPlayerTrigger volumes for the best experience and clarity. Sometimes you can use scripts to hide or show MusicPlayerTriggers (with different priorities) in the scene to create music transitions.
·
When two MusicPlayerTriggers differ only in volume settings, the MusicPlayer is optimized to perform a smooth volume transition without
interrupting or stopping the music playback.
Performance
tips or guidelines:
·
The AL Sound Manager performs numerous checks during editor playmode to
verify proper configuration. Keep an eye on your console log for any potential
issues and address them as needed. The warnings are designed to be
self-explanatory. :)
·
Ensure that AudioSourceWrappers are managed correctly in your code. When they are no longer needed,
call the appropriate methods to return them to the pool. If you are destroying
objects containing these wrappers, make sure the wrappers are stopped and
returned to the pool first. While the AL
Sound Manager automatically removes destroyed audio sources from its pool
(this will be reported as an error in the console), it is considered best
practice to clean up unused resources in your code manually to avoid
unnecessary garbage accumulation.
8. Support
· Email support: support@actalogic.com
· Discord channel: https://discord.gg/9tJfA3BduM
· Web page: https://www.actalogic.com
· Unity discussions: coming soon!
We have a dedicated Discord channel with an AL SOUND MANAGER section where you can access the following channels:
- #general: General information and discussions.
- #announcements: Latest updates and news.
- #roadmap: Upcoming features and development plans.
- #support: Assistance for general queries and issues.
- #bugs: Report package bugs and glitches.
- #feature-requests: Request changes or propose new features.
Feel free to join the community and stay updated! 😊